Advanced Setup For Xin Inventory 2.0 Server - If normal installation failed
By default, Xin Inventory 2.0 server environment should be setup correctly if install Xin Inventory as Server / Standalone. However, under some circumstances the installation and configuration might failed .This document is help the advanced user to setup Xin Inventory correctly. To know Xin Inventory simple setup and architecture, Please refer to the Xin Inventory 2.0 Network Setup for referrence.
Steps perform during Xin Inventory 2.0 Server Setup
There are 3 main steps that will be performed by Xin Inventory 2.0 setup during installation.
1. MS SQL Server 2008 Express Setup and configuration
2. Firewall add port for Client/LAN user access
3. Enable folder permission
4. Install Xin Inventory 2.0 as client in server.
5. Open Xin Inventory 2.0 in server.
1. MS SQL Server 2008 Express Setup and configuration
- Install MS SQL Server 2008 Express
Xin Inventory 2.0 will install Microsoft SQL Server 2008 R2 RTM Express into the computer. If there is any failure, please download http://www.microsoft.com/en-us/download/details.aspx?id=23650 and install MS SQL 2008 R2 RTM Express. Download SQLEXPR_x86_ENU.exe if you are using 32bit machine and download SQLEXPR_x64_ENU.exe if you are using 64bit machine. For more information, please contact our support http://support.xincube.com
For the installation steps, please refer to http://blogs.msdn.com/b/bethmassi/archive/2011/02/18/step-by-step-installing-sql-server-management-studio-2008-express-after-visual-studio-2010.aspx
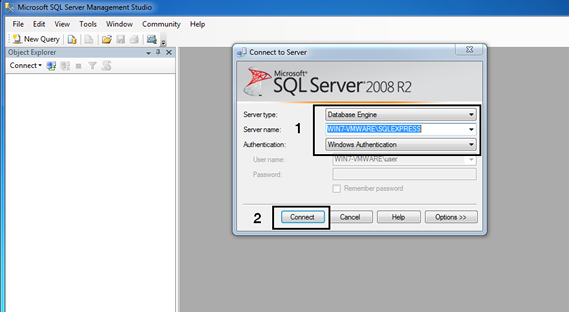
Please open SSMS and connect to the Microsoft SQL Server 2008 R2 RTM Express . Server name: "your
computer name" \ "instance Name". For my case, my computer name is WIN7-VMWARE and instance name is SQLEXPRESS. Click on determine SQL Server instance name to know how to check the instance name.
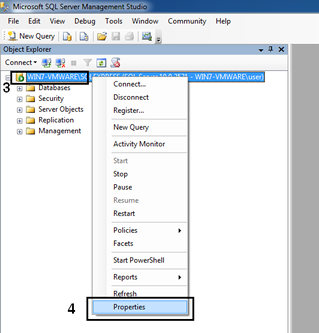
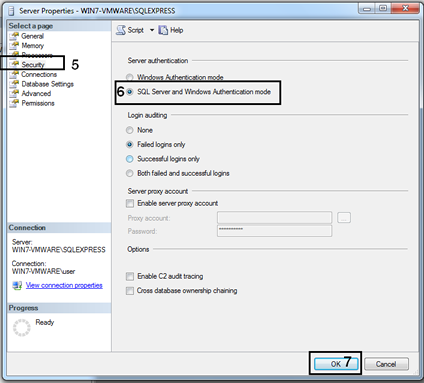
Right Click on the Server and click on Properties.
Click on Security on the left hand menu. Change the Server Authentication to SQL Server and Windows Authentication mode and click OK button.
- Create Xin Inventory database
If there is newer MS SQL Server that already running in the server, please download XinInventorybak.zip unzip the file and restore into the server. Please contact our support http://support.xincube.com if have any issues.
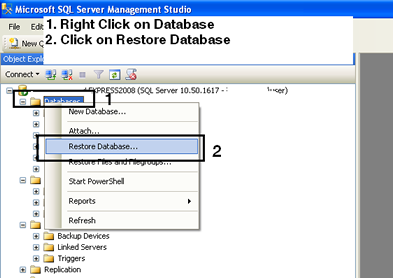
Open SSMS and connect to SQL Express 2008 Database. Right Clcik on the database and click on Restore Database.
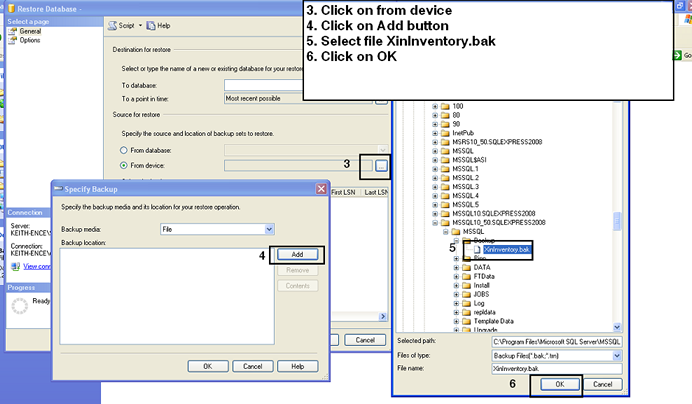
Click on From device and browse button. After that click on Add button and select the database file. Click on OK button after select the file.
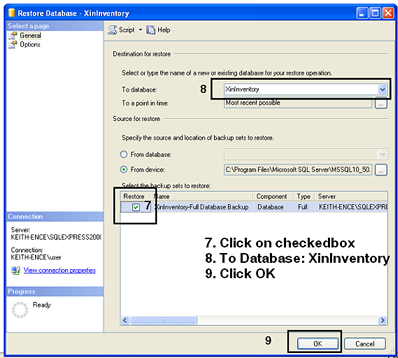
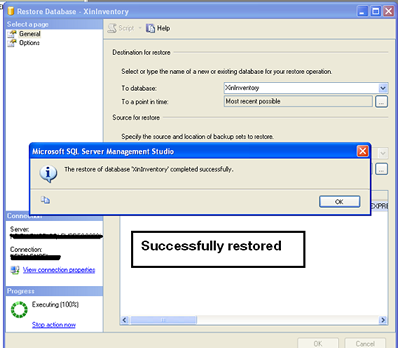
Click on the Checkedbox in Select the backup sets to restore and enter the database name: XinInventory and click on OK button to restore XinInventory database to SQL server.
A message will be display after the database has been restored successful.
- Create Xin Inventory database's user login
By default, the setup will create Xin Inventory 2.0 database user. If there is any failure, please contact our support.
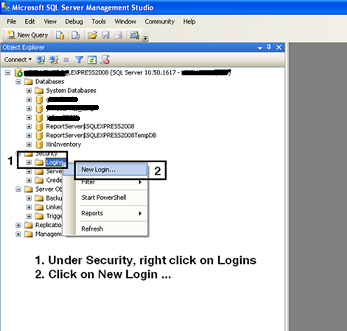
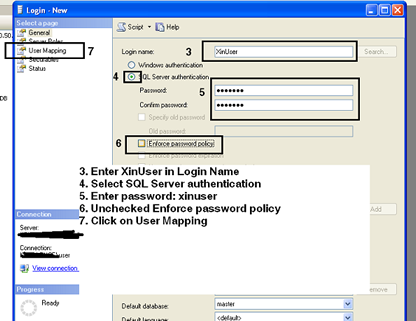
Open SSMS and connect the SQL database. Expend the folder under Security folder. Right click on the Logins and click on New Login.
Enter Login name: XinUser and select SQL Server Authentication. After that enter Password: xinuser . Unchecked the Enfore password policy checkedbox then click on User Mapping on the left hand menu.
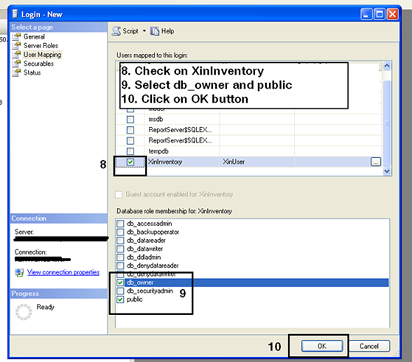
Check on XinInventory and then Select db_owner. Click on OK button once done.
- Enable TCP/IP
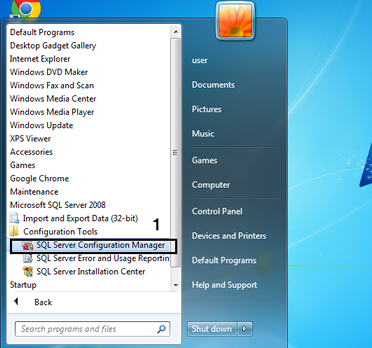
Open SQL Server Configuration Manager (Under to Start -> Microsoft SQL Server 2008 -> Configuration Tools -> SQL Server Configuration Manager)
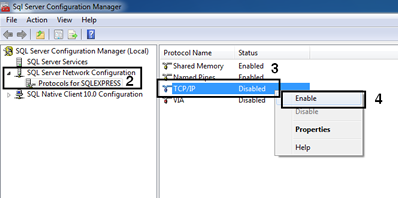
Expend SQL Server Network Configuration and click on Protocols for XXXXXXXX. On the right panel, right click on TCP/IP and click on Enable.
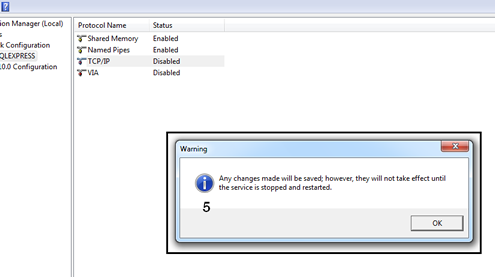
A warning message to request restart SQL Express service.
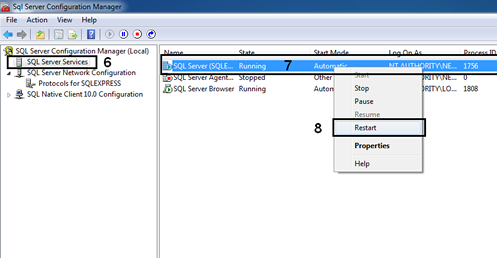
Click on SQL Service Services on the left panel, the right click on SQL Server (SQLExpress). Click on Restart to restart SQL Server service.
- Enable Microsoft SQL Browser service and SQL Server (xxxx) service
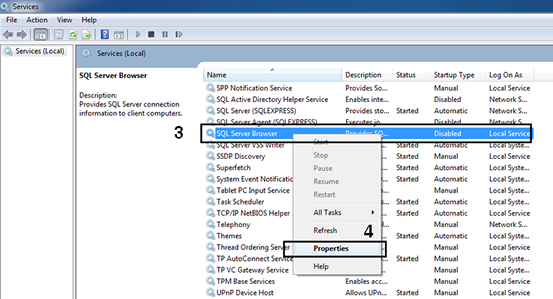
You also can access to Services by Control Panel -> Admistrative Tools -> Services
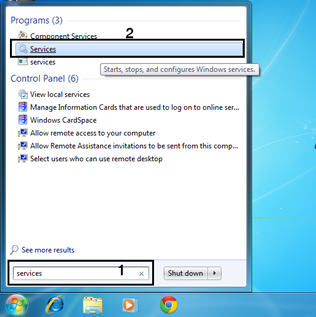
In the Services window, locate SQL Servcer Browser and right click on it. In the popup window, click on Properties.
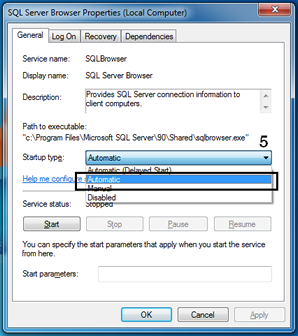
Change the Startup type to Automatic if it's in others type.
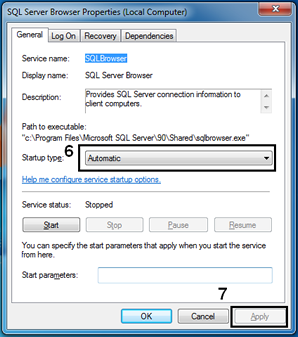
Click on Apply button after change to Automatic
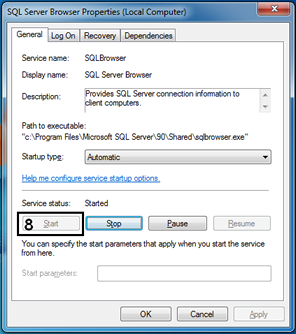
Click on Start button to make sure the service is started.
- Check Dynamic Port Number
Open SQL Server Configuration Manager (Under to Start -> Microsoft SQL Server 2008 -> Configuration Tools -> SQL Server Configuration Manager)

Under SQL Network Configuration, click on Protocols for SQLEXPRESS
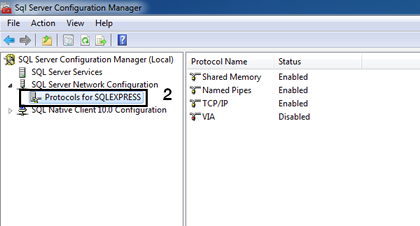
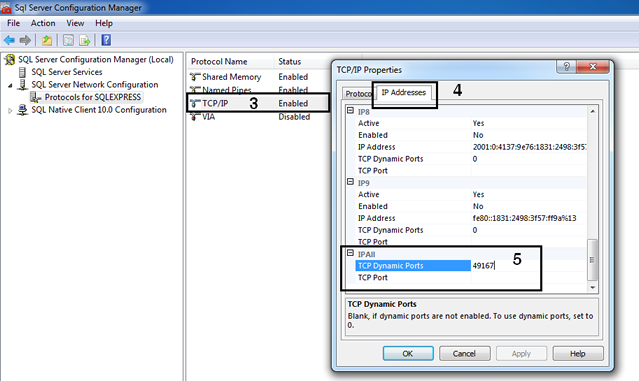
On the right Panel, right click on TCP/IP and select Properties. Then select tab "IP Addresses". Scroll down until we can see TCP Dynamic Ports that under IPAll. Copy this value, in this sample the value is 49167. We will need to open firewall port 49167 for others network user to access to SQL Server 2008 Express.
2. Firewall add port for Client/LAN user access
- Add Port Number to Firewall
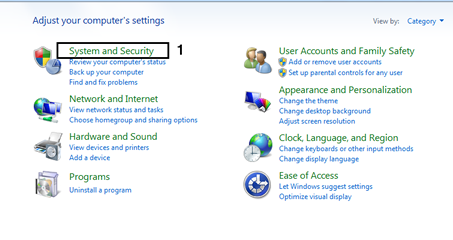
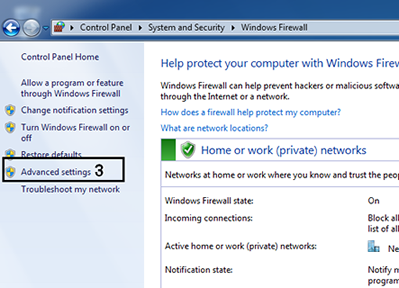
To access to Windows Firewall setting, go to Control Panel and click on System and Security.
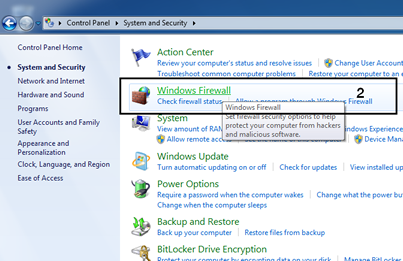
Click on Windows Firewall.
In the Windows Firewall windows, click on Advances Settings.
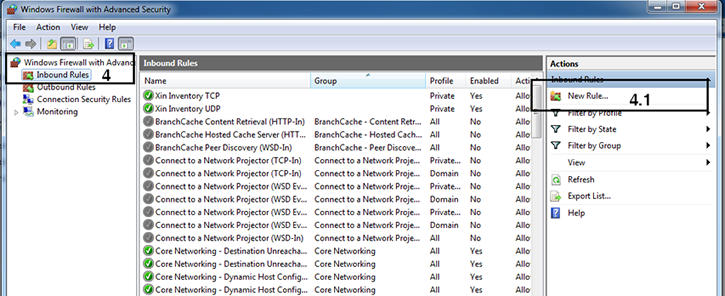
Click on Inbound Rules and then click on New Rule
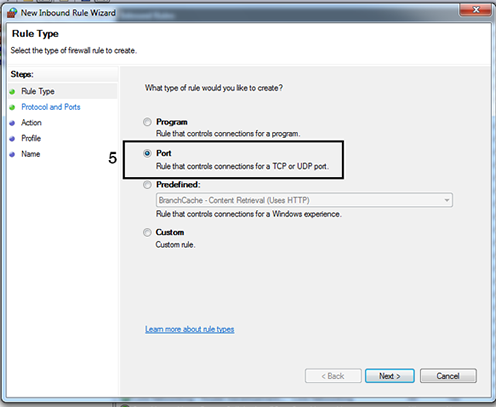
Select Port and click Next button.
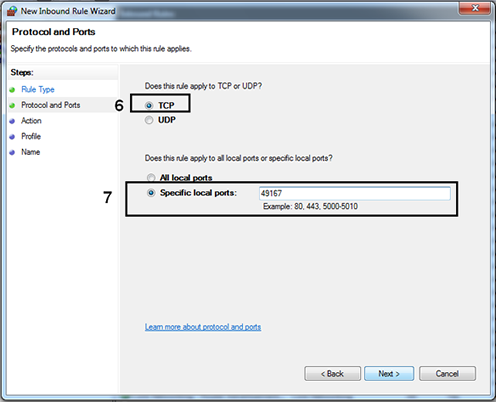
Select TCP and enter port number (Dynamic port that obtain from SQL Server TCP/IP Dynamic port) in Specific local ports and click Next button. In this case, i enter 49167 which i obtain from previous activiry.
Select Allow the connection and click Next button.
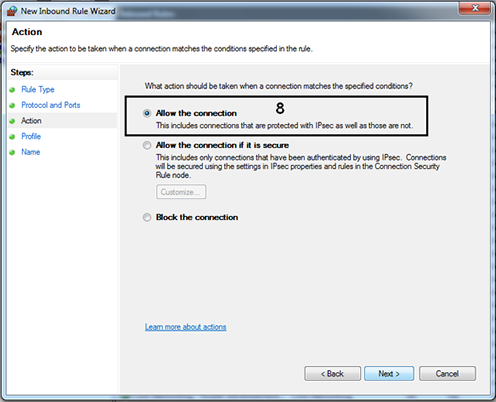
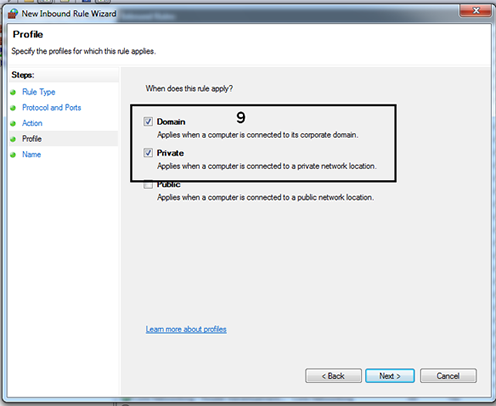
Select Domain and Private and click Next button.
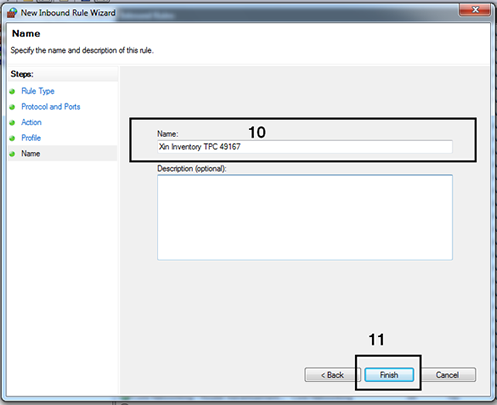
Enter a name, in this sample, we put Xin Inventory TCP + port number. Click on Finish button.
3. Enable folder permission
- Share Xin Inventory 2.0 installed folder.
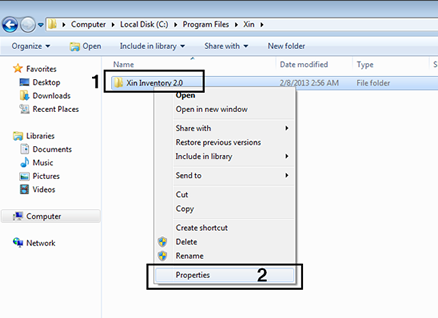
1. Right click on Xin Inventory 2.0 folder.
2. Then click on Properties.
3. Click on Sharing Tab
4. Click on Advanced Sharing button.
5. In the Advanced Sharing window, checked on Share this folder.
6. Click on Permission button.
7. In the Permission for Xin Inventory 2.o window, check on Allow Change checkedbox.
8. Click on OK button.
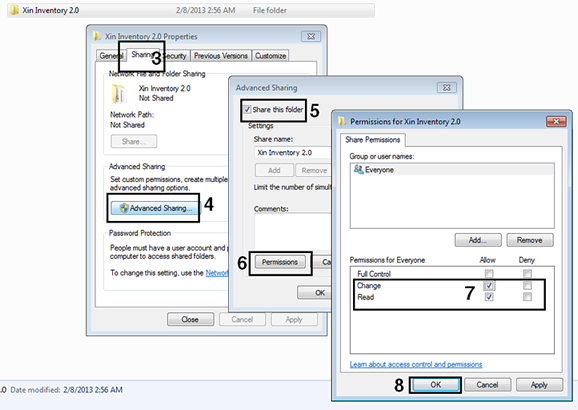
- Set permission for Everyone (Modify permission)
Go to Xin Inventory 2.0 folder. By default, the installation folder in 32 bit machine is "C:\Program Files\Xin\Xin Inventory 2.0" and for 64 bit machine is "C:\Program Files (x86)\Xin\Xin Inventory 2.0".
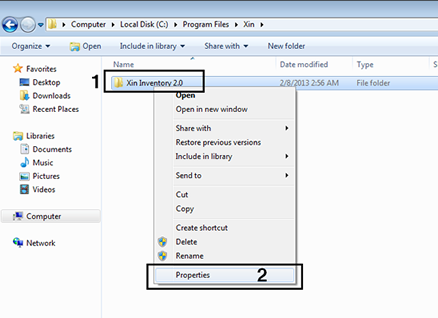
1. Right click on Xin Inventory 2.0 folder.
2. Then click on Properties.
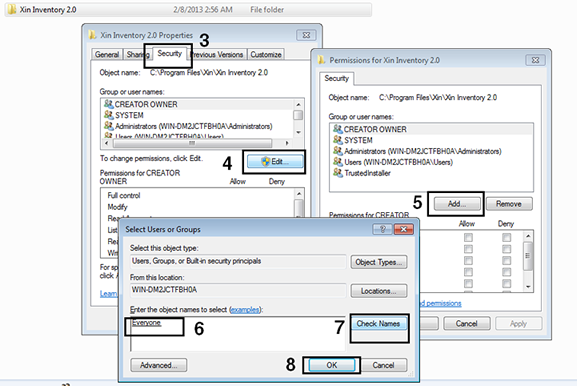
3. Select Security tab
4. Click on Edit button
5. In the Permissions for Xin Inventory 2.0 window, click on Add button.
6. Type everyone in the Select Users or Groups window
7. Click on Check Names button.
8. Click on OK button.
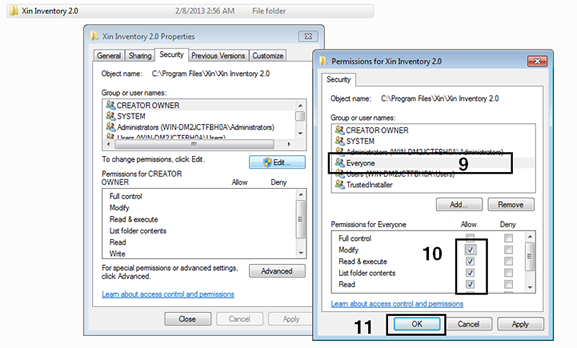
9. In the Permissions for Xin Inventory 2.0 window, select Everyone.
10. Check on Allow Modify check box.
11. Click on OK button.
4. Install Xin Inventory 2.0 as client in server
-
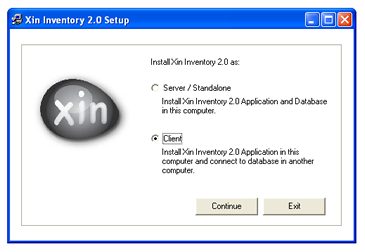
Select install Xin Inventory 2.0 as Client.
5. Open Xin Inventory 2.0 in Server
We can test on it once the installation is completed. Click on Xin Inventory 2.0 icon in Desktop to open Xin Inventory 2.0 for the first time.
2. Select Local
3. Try to enter SQLEXPRESS as instance name. Click on determine SQL Server instance name to know how to check the instance name.
4. Click on Test Connection button to test connection.
5. Click on OK button if the network connection tested ok.
6. Click on Save button to save the setting.
Free invoice software trial!
Click on the button to Xin inventory software download page.
billing software
You can download Xin Inventory 2.0, 30 days trial version. After 30 days trial, if you wish to continue to use Xin Inventory 2.0, you can purchase the registration key to unlock the inventory software.
Buy Xin Inventory software!
Click on the button to Xin Inventory software purchase page.
billing software
You can purchase Xin Inventory 2.0 registration key to unlock this inventory software and use it permanently. After you purchase the key, our system will send the key to you through email.
